OECT 安装与 LXC 部署 OpenWrt 教程
1️⃣ 主系统选择
OECT最近很火,入手后考虑刷机。
K2P + N1已满足家庭网络大部分需求,OECT 4G内存,单独跑OpenWrt太奢侈,决定主系统选择 Armbian。
专业的事情交给专业的系统处理:
- Armbian 作为主系统
- OpenWrt 通过LXC 容器部署,与Armbian共享内核,不干扰主系统
2️⃣ 刷机注意事项
- 使用顶部 Type-C 接口刷机,不要插电源线
- SATA 线不要硬拔
- 短接 GND 与 1V8(GND 建议使用 DEBUG 点)
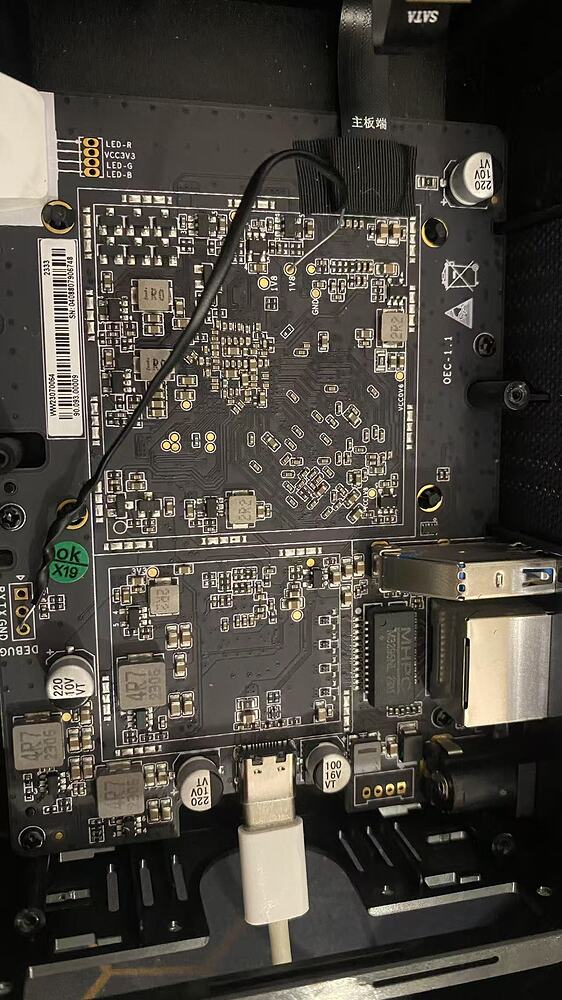
- 刷机工具配置:
- 地址 0xCCCCCCCC 名称 LoaderToDDR
- 地址 0x00000000 名称 system
3️⃣ 建立 br0 网桥(Armbian)
Armbian创建br0网桥,把宿主机物理网卡和LXC/OpenWrt容器网络桥接,让容器在局域网里表现得像一台真正的独立设备。
编辑 Netplan 配置:
1
2
3
4
5
6
7
8
9
10
11
12
13
14
15
16
17
18
19
20
21
| network:
version: 2
renderer: networkd
ethernets:
eth0: {}
bridges:
br0:
interfaces: [eth0]
addresses: [192.168.1.10/24]
routes:
- to: default
via: 192.168.1.1
nameservers:
addresses: [8.8.8.8, 1.1.1.1]
````
应用配置:
```bash
sudo netplan apply
ip addr show
|
4️⃣ 换清华源
1
2
3
| vi /etc/apt/sources.list.d/ubuntu.sources
URIs: https://mirrors.tuna.tsinghua.edu.cn/ubuntu/LXC
|
5️⃣ 安装 LXC
1
2
| sudo apt update
sudo apt install lxc bridge-utils
|
为什么选择 LXC 而不是 LXD
- LXC相当于没有界面的Docker
- LXD简化LXC命令,但需要Snap,Snap占用空间多,容器与主系统互通性差
- OECT空间有限,果断裸跑LXC
6️⃣ 配置 OpenWrt 容器
1
2
3
| sudo mkdir -p /var/lib/lxc/openwrt
sudo mkdir -p /var/lib/lxc/openwrt/rootfs
vi /var/lib/lxc/openwrt/config
|
内容示例:
1
2
3
4
5
6
7
8
9
10
11
12
13
14
15
16
17
18
19
20
|
lxc.include = /usr/share/lxc/config/common.conf
lxc.arch = aarch64
lxc.apparmor.profile = unconfined
lxc.apparmor.allow_nesting = 1
lxc.rootfs.path = dir:/var/lib/lxc/openwrt/rootfs
lxc.uts.name = openwrt
lxc.start.auto = 1
lxc.start.delay = 20
lxc.net.0.type = veth
lxc.net.0.link = br0
lxc.net.0.flags = up
lxc.cgroup2.devices.allow = c 10:200 rwm
lxc.mount.entry = /dev/net/tun dev/net/tun none bind,create=file
|
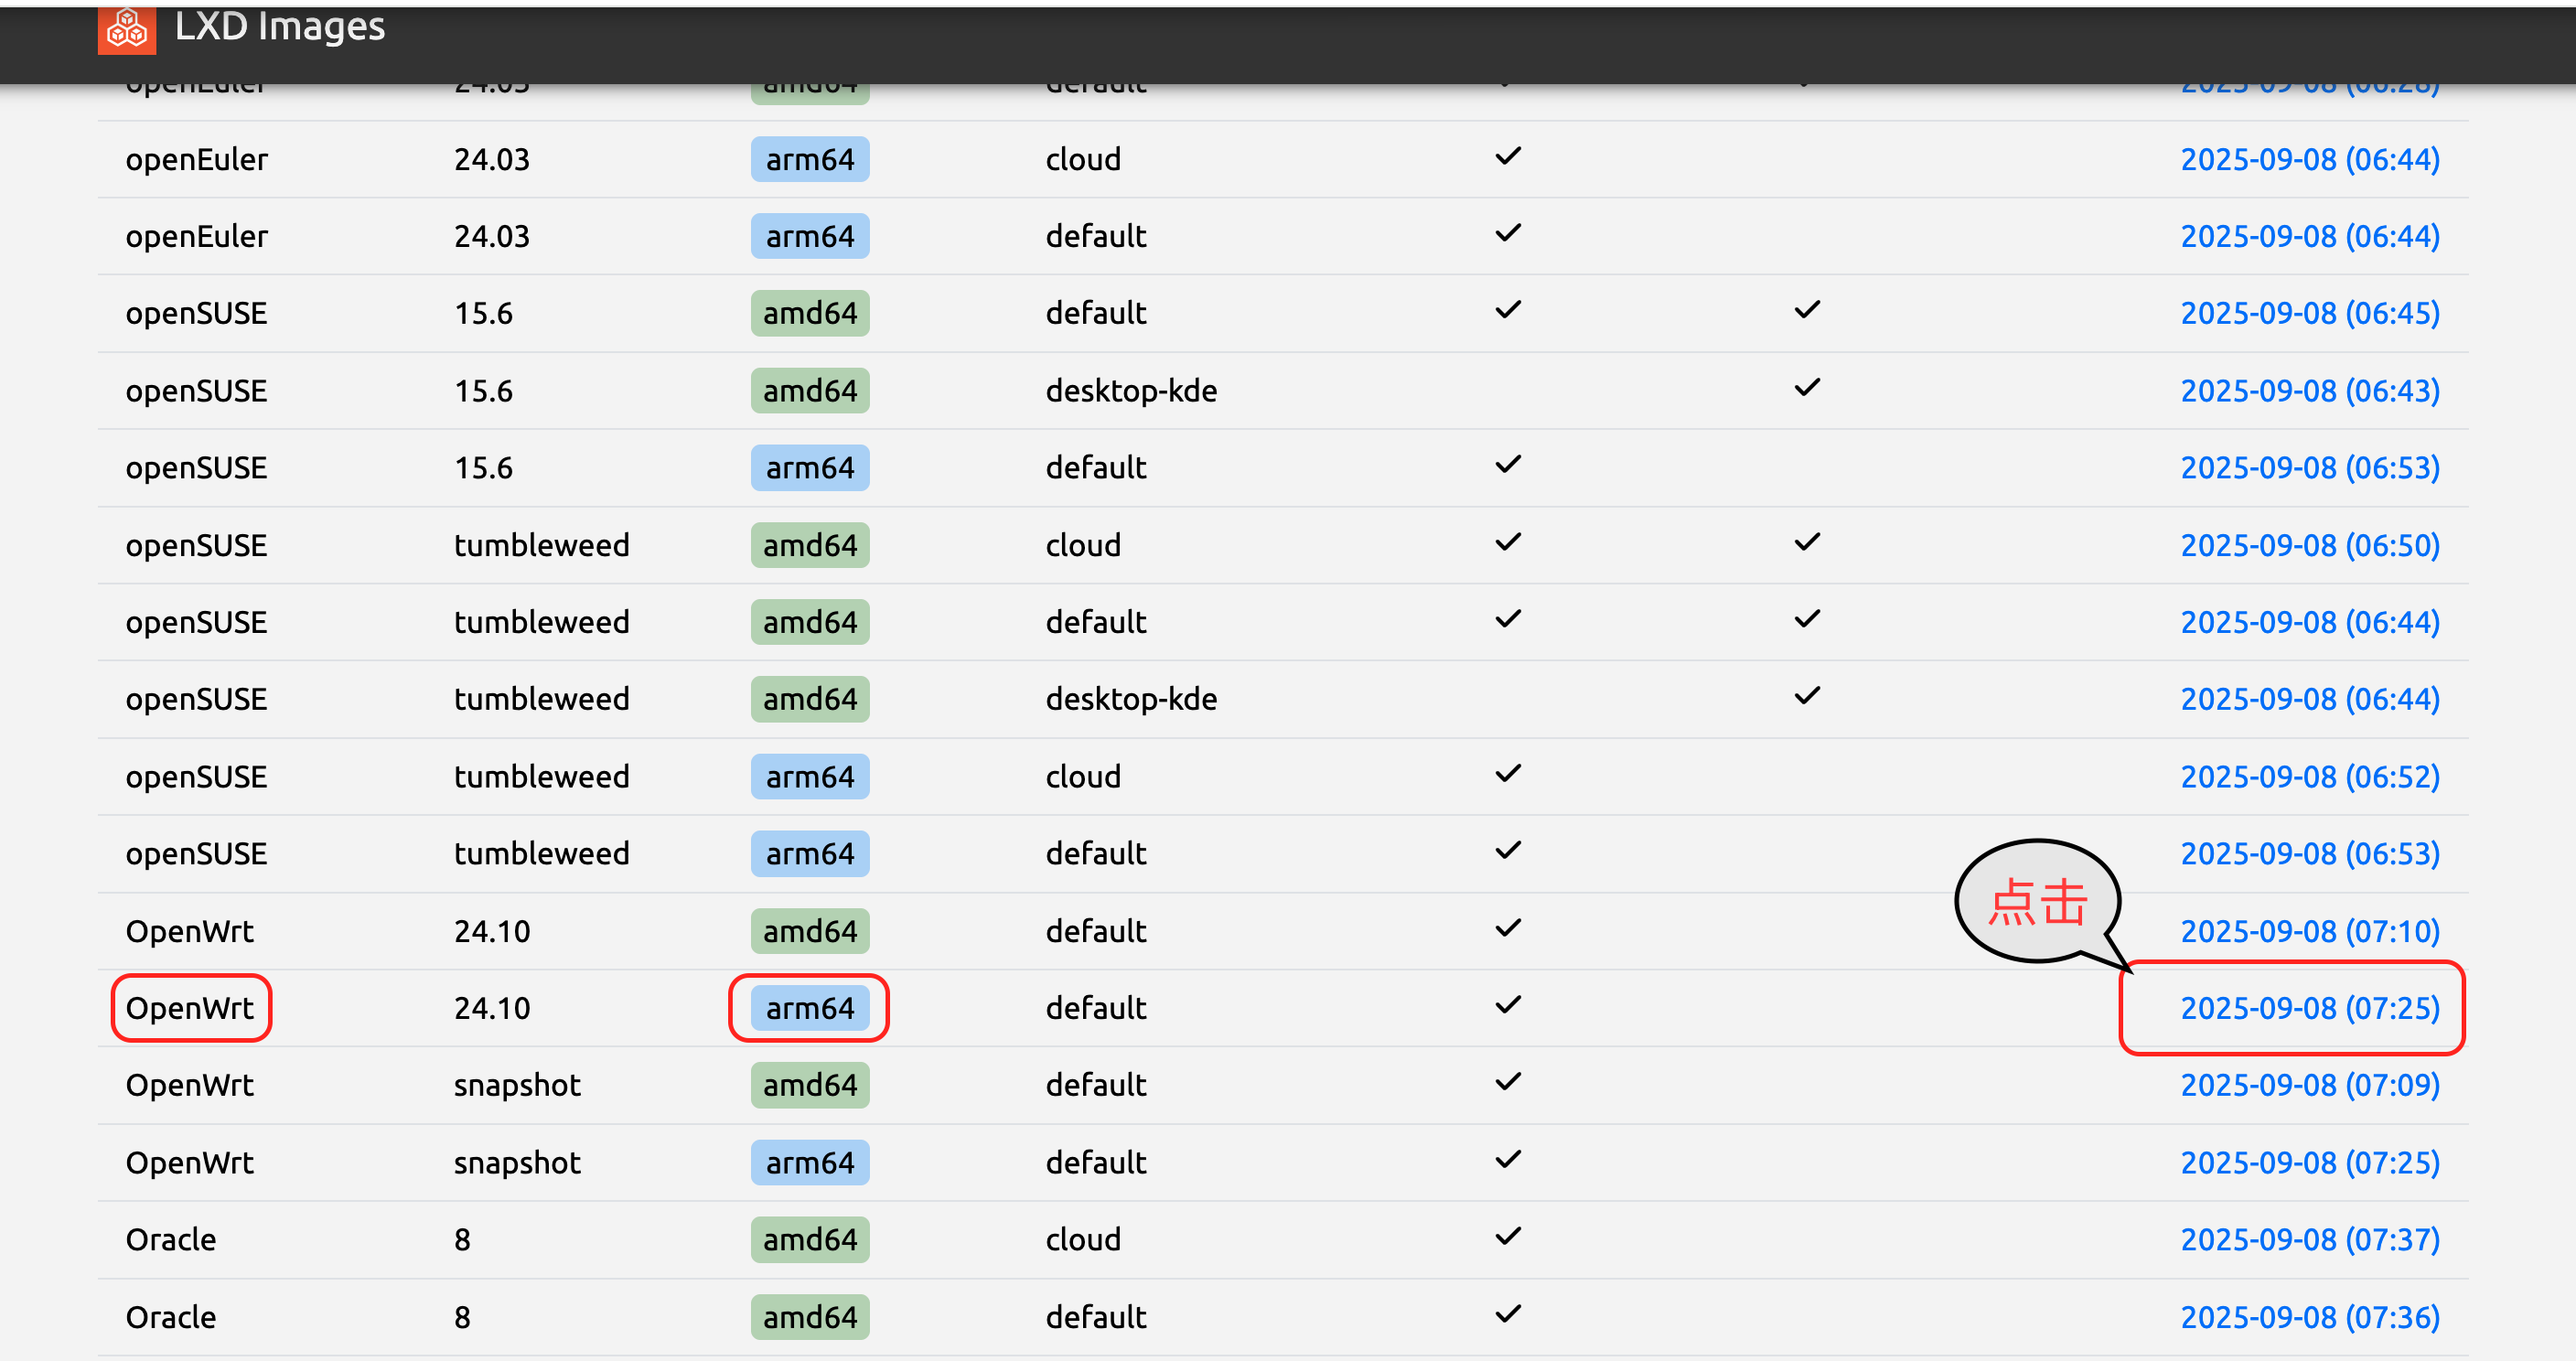
7️⃣ 下载与安装 OpenWrt 镜像
镜像分两类:原版Openwrt镜像、国内Openwrt分支镜像。
原版镜像
1、原版安装Openwrt方法
原版镜像下载地址:https://images.lxd.canonical.com/
进入网页选择openwrt相应的版本,点击日期下载红框的两个文件,上传到root文件夹内。
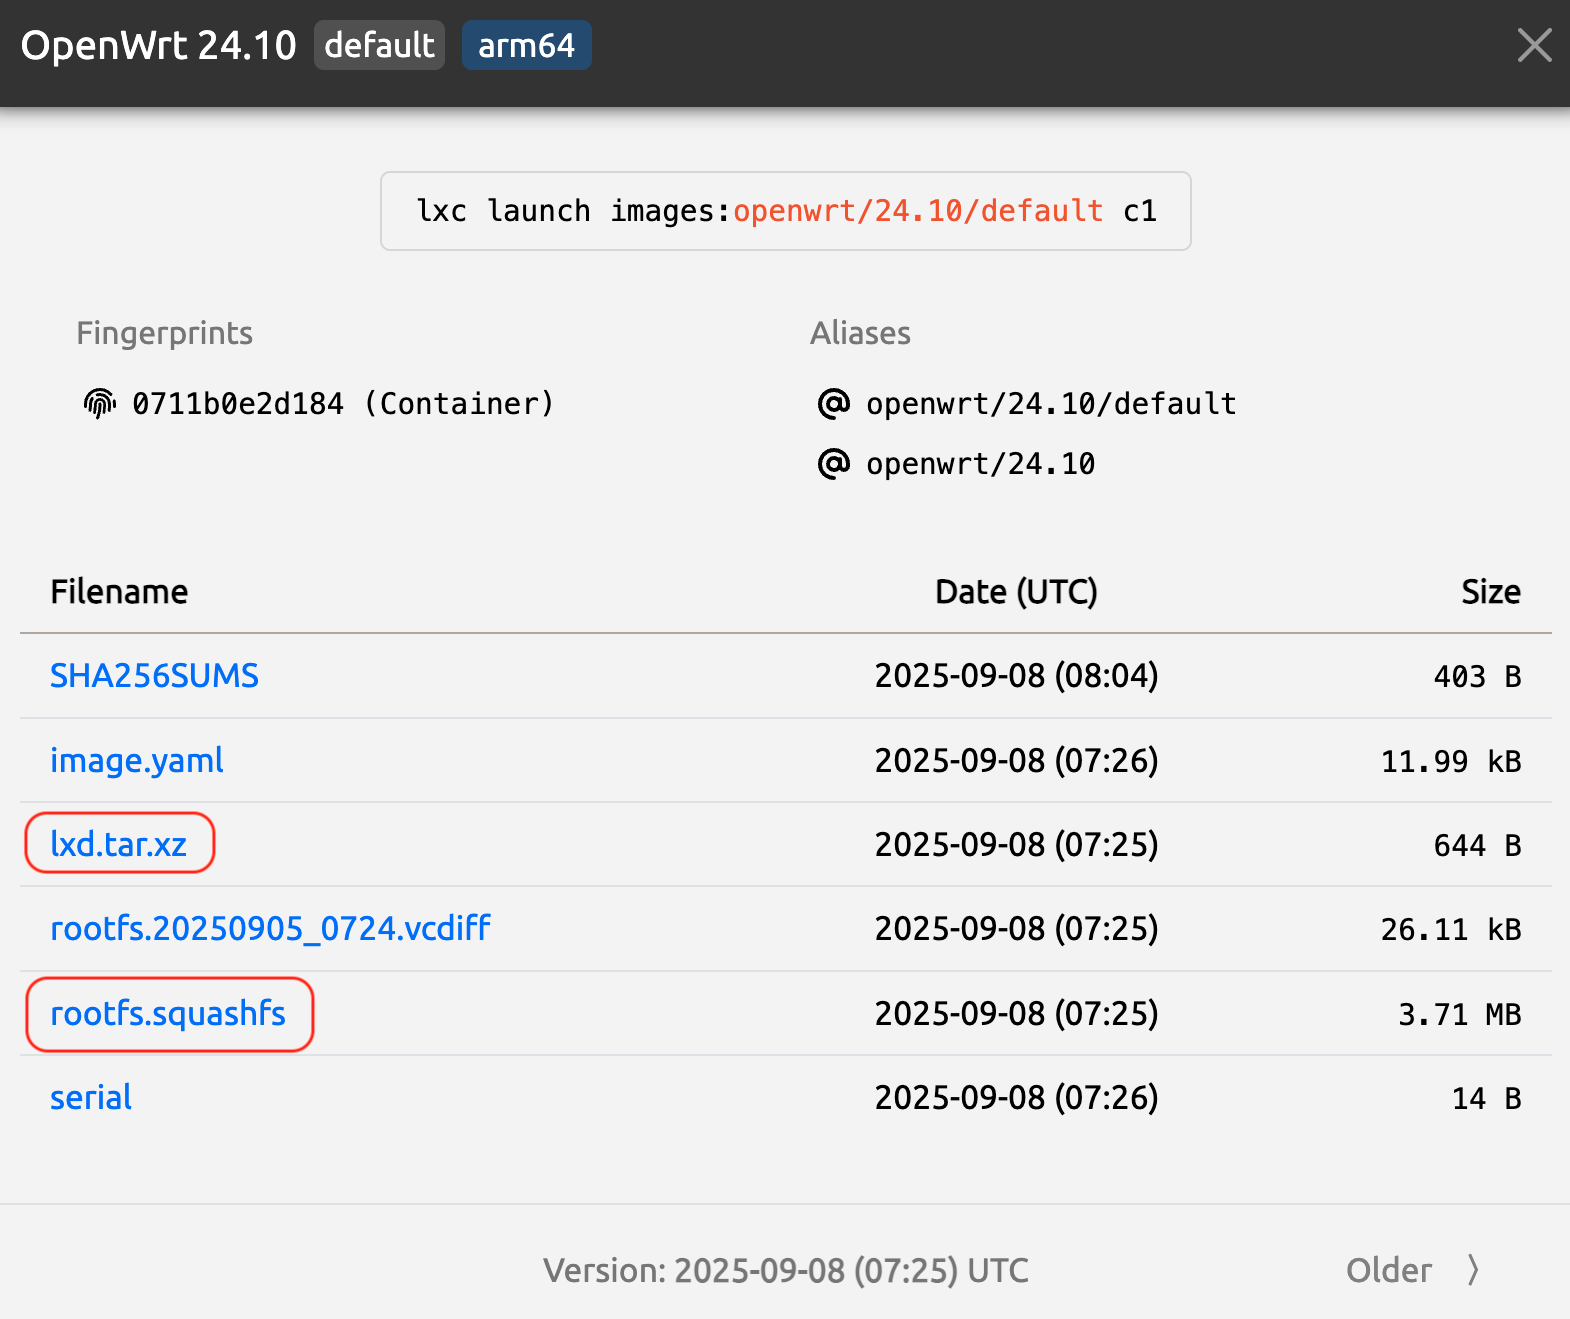
1
2
3
4
5
|
sudo apt install squashfs-tools
unsquashfs rootfs.squashfs
cp -a squashfs-root/* /var/lib/lxc/openwrt/rootfs/
tar -xJf lxd.tar.xz -C /var/lib/lxc/openwrt/rootfs/
|
国内分支镜像(immortalwrt / istoreOS)
2、国内分支安装Openwrt方法
国内分支镜像众多,immortalwrt和istoreOs人数占多。这两个固件格式都是img.gz,使用mv重命名为opewrt.img.gz
然后输入以下命令。
1
2
| gzip -d openwrt.img.gz
fdisk -l openwrt.img
|
屏幕出现loop1和loop2,计算offset,offset=$((START_SECTOR * 512)),大分区的start数值乘于512,就得出了offset的数值。把数值带入下面的offset
1
2
3
| mkdir /mnt/openwrt
mount -o loop,offset=$offset openwrt.img /mnt/openwrt
cp -a /mnt/openwrt/* /var/lib/lxc/openwrt/rootfs/
|
8️⃣ 启动 OpenWrt 容器
9️⃣ 常用 LXC 命令
1
2
3
4
5
6
7
8
9
10
11
12
13
14
15
16
17
18
19
20
21
22
23
24
25
26
27
28
29
30
31
32
33
34
35
36
37
38
39
40
|
lxc-create
lxc-config
lxc-update-config
lxc-start
lxc-execute
lxc-attach
lxc-console
lxc-autostart
lxc-usernsexec
lxc-unshare
lxc-stop
lxc-destroy
lxc-ls
lxc-info
lxc-monitor
lxc-top
lxc-wait
lxc-copy
lxc-snapshot
lxc-freeze
lxc-unfreeze
lxc-cgroup
lxc-device
lxc-checkconfig
lxc-checkpoint
|
参考资料
- 小饭要干饭 - B站
- fitnessele - 恩山论坛
- hereyes - 恩山论坛


